Stance: Training Tip Tuesday
Tuesday is here and it’s time to begin “training tip Tuesday”. This is where we are going to talk about training tips and techniques. We are going to start with the fundamentals of; stance, grip, sight picture, trigger control, and follow through. Today’s post will focus on shooting stance and why it is so important.
What do building a house, baking a layer cake, and shooting all have in common? to be successful they all require a solid foundation. In a house it is brick, cinder block, or cement. The first layer of a cake needs to be the most level or the cake will fall. In shooting it all starts with what touches the ground…for most of us, that’s our feet.
If you ask 100 firearms instructors what the best shooting stance is, you will get several different answers. The truth is that none of them are wrong. It really depends on several different factors but, there are 3 “main” shooting stances.
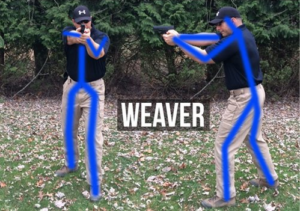 The first is the Weaver stance. this stance was developed in the late 1950’s by competition shooter and L.A. county deputy, Jack Weaver. There are a couple different tales on how this stance developed but, the short versions are that it was either that he was competing in quick draw competitions and wanted a way to draw and use sighted fire as quickly as possible. The other is that there was a match coming up and he had an injury that prevented him from fully extending his support (or non firing) arm. Either way because of his success in matches this became the “standard” shooting platform for civilians, and law enforcement alike. This stance is characterized by the following.
- The shooters body is bladed (turned sideways) to the target by placing the strong side foot back and turning the support side of the upper body towards the target.
- The strong or firing arm is extended with the support arm elbow bent
Pros: This allows the shooter to use a very stable “push/pull” grip where the firing arm pushes and the support arm pulls, making it easier to manage recoil. This is a great “marksman” style stance and is very stable.
Cons: The biggest cons to me are that in the L.E. sector this stance can expose part of your body (side) that is unprotected. In the civilian world this stance can be difficult to maintain in a dynamic, defensive situation.
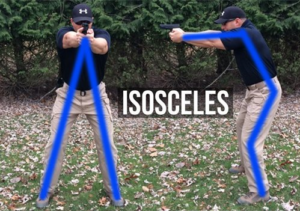 The next stance is the isosceles stance. This stance is the most commonly taught to new shooters. This is because many argue that it mimics the body’s natural reaction posture that will happen in a defensive situation. Like the Weaver stance this stance became popular when in the 1980’s Brian Enos, and Rob Leatham began using it to win IPSC shooting competitions. This stance is formed by.
- Squaring the shoulders to the target.
- Feet are shoulder width or even a little more apart. With toes pointing towards the target.
- Knees are slightly bent.
- Both arms are extended so that along with the shoulders form a triangle (shocker right)
Pros: The major positives to this stance are that it feels like a very natural stance to most people, because of the fully extended arms it allows for greater recoil management. This has a positive effect on accuracy when delivering multiple shots.
Cons: While this stance is very stable side to side, it is unstable forward to back. This stance also does not allow the shooter to be as agile during movement.
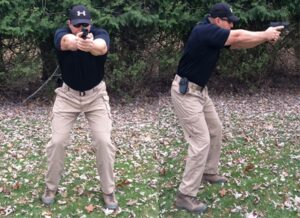 This final stance can be called by many names; fighting, boxer, tactical, modified isosceles, etc. I call it a “fighting” stance and it is the one that I use and teach in my Concealed Carry and Home Defense Fundamentals and my Basic Pistol courses because, I believe that it strikes the right balance of natural feeling, stability, and ease of movement. It was developed in the military/special forces and has made its way into civilian defensive shooting. This stance is similar to the isosceles.
- The shooters shoulders are squared to the target.
- Feet roughly shoulder width apart
- The strong (or firing) side foot is slightly back
- Knees slightly bent
- Both arms fully extended
Pros: This stance works for any weapon system; handgun, rifle, knife, baton, etc. so you only need to train one stance. This stance provides stability both side to side and front to back. It also makes it easy to move in any direction, allowing you to stay more dynamic.
Cons: There really aren’t any. By modifying the isosceles to be more stable it eliminates the main drawback of the isosceles. If I had to give a con it is that it can sometimes be harder for people with mobility problems to get into properly.
Like I said before, everyone has the stance that they prefer, and they all have pros and cons. find the one that works best for you and the type of training that you are doing.

Recent Comments